728x90
import / export
- require : NodeJS에서 사용되는 CommonJS 키워드이다.
- import : ES6에서 새롭게 도입된 키워드이다.
- 두 키워드 모두 다른 파일의 코드를 불러오는 키워드지만, 다른 문법 구조를 가진다.
// require 키워드
const library = require("library")


// import 키워드
import library from "library"
//--------- export -----------------------------------------------
// node.js에서는 module.exports를 했었는데
// 내보낼 컴포넌트가 여러개일 경우
export {test1, test2}
// 단일(한 개만) 내보낼 경우
export default test;
//--------- import -----------------------------------------------
// ./Components/LoginBtn에서 export {LoginBtn}으로 작성됨
import {test1, test2} from "./Components/LoginBtn"; // 구조분해할당으로 받는 경우는 export된 이름대로 적어야한다.
// 가져와서 Login이라는 이름으로 사용할 것이다.
import Login from "./Components/LoginBtn";
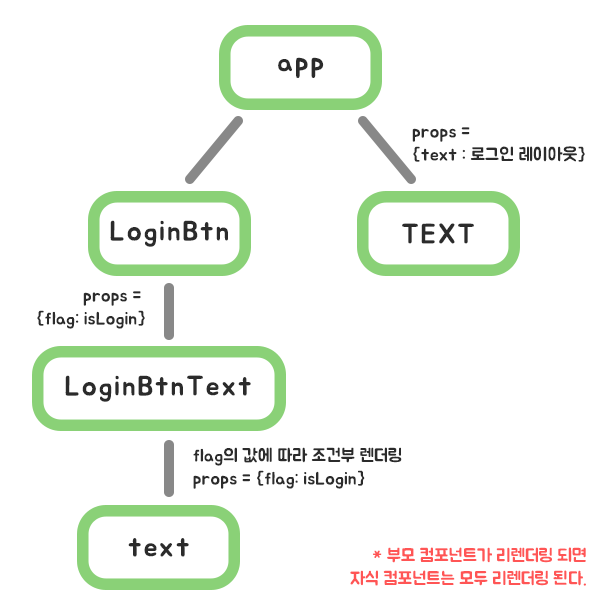
Class 컴포넌트_토글버튼 제작
- app 컴포넌트
- 페이지의 전체 그림을 render한다.
- TEXT 컴포넌트의 text속성에 "로그인 레이아웃" 값을 props로 보내준다.
- TEXT 컴포넌트
- app 컴포넌트에서 보낸 값을 props로 받아 h2태그로 render한다.
- LoginBtn 컴포넌트
- this.handleClick = this.handleClick.bind(this);
- LoginBtn의 constructor의 state를 가리킨다.
- button태그를 render한다.
- 해당 태그를 클릭하면 this.handleClick을 실행한다.
- LoginBtnText 컴포넌트의 flag의 값을 해당 컴포넌트의 state 값으로 보내준다.
- this.handleClick = this.handleClick.bind(this);
- LoginBtnText 컴포넌트
- LoginBtn에서 props로 받은 상태 값으로 LoginBtn의 버튼 태그에 입력한다.
  <body>
    <div id="root"></div>
  </body>


  <script type="text/babel">
    class TEXT extends React.Component {
      constructor(props) {
        super(props);
        console.log("TEXT", props);
      }

      render() {
        return (
          // props 라는 속성을 받아 사용할 예정
          <h2>{this.props.text}</h2>
        );
      }
    }

    class LoginBtnText extends React.Component {
      constructor(props) {
        super(props);
        console.log("LoginBtnText", props);
      }

      render() {
        // this.props.flag : 조건부 렌더링
        // 속성이름으로 props에 전달하는 객체의 키 값으로 전달된다.
        // props = {text : "로그아웃"}
        return this.props.flag ? (
          <TEXT text="로그아웃" />
        ) : (
          <TEXT text="로그인" />
        );
      }
    }

    class LoginBtn extends React.Component {
      constructor(props) {
        super(props);
        this.state = {
          isLogin: false,
        };
        // bind메소드: 해당 메소드로 바인딩하면 함수 호출할 때 컨텍스트를 유지할 수 있다.
        // react에서 유용하게 쓸 수 있다.
        this.handleClick = this.handleClick.bind(this);
      }

      handleClick() {
        this.setState({ isLogin: !this.state.isLogin });
      }

      render() {
        return (
          <button onClick={this.handleClick}>
            <LoginBtnText flag={this.state.isLogin} />
          </button>
        );
      }
    }

    class App extends React.Component {
      constructor(props) {
        super(props);
        this.state = {
          isLogin: false,
        };
      }

      render() {
        return (
          <>
            <TEXT text="로그인 레이아웃" />
            <LoginBtn />
          </>
        );
      }
    }

    // 루트요소 생성
    // 루트로 설정
    const root = ReactDOM.createRoot(document.querySelector("#root"));
    root.render(<App />);
  </script>
React 라이브러리 다운로드

VS Code의 터미널에서
npx create-react-app test
를 입력하면 리엑트 라이브러리가 해당 경로에 test 폴더를 생성하고 그 안에 다운로드된다.
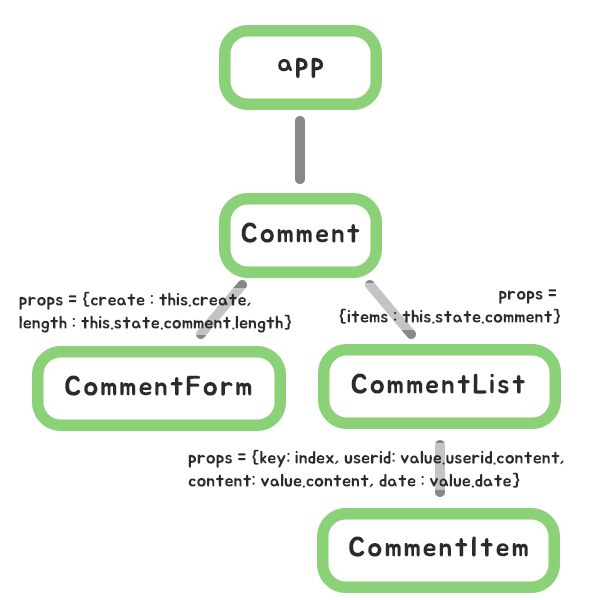
Class 컴포넌트_댓글 등록
- app 컴포넌트
- html에서 선언한 id값을 root로 가진 div 태그를 참조하는 가상 DOM에서 render 되는 컴포넌트이다.
- 댓글 레이아웃을 가진 Comment 컴포넌트를 render한다.
- Comment 컴포넌트
- state 값으로 comment 배열을 갖는다.
- this.create = this.create.bind(this);
- this.create는 Comment를 가리킨다.
- create() 함수를 CommentForm 컴포넌트로 보내준다.
- ComentForm 컴포넌트에서 input으로 입력받은 값을 create 함수의 코드대로 작성한다.
- render()에서 CommentForm 컴포넌트와 CommentList 컴포넌트로 값을 참조하여 전달한다.
- CommentForm
- create로 Comment 컴포넌트의 create 함수를 보낸다.
- length로 Comment 컴포넌트의 state.comment.length의 값을 보낸다.
- CommentList
- items로 Comment 컴포넌트의 state.comment의 값을 보낸다.
- CommentForm
- CommentForm 컴포넌트
- constructor의 state.value의 값은 input으로 받아온 값이 들어간다.
- this.changeHandler = this.changeHandler.bind(this);
this.submitHandler = this.submitHandler.bind(this);- this.changeHandler와 this.submitHandler는 CommentForm를 가리킨다.
- render() 함수에서 form 태그로 input으로 입력한 내용을 submithandler()함수로 등록한다.
- h4 태그로 Comment에서 받은 state.comment의 length 값을 출력한다.
- input 태그의 값을 입력하거나 삭제하여 값이 변할 때마다 onChange가 동작하여 changeHandler 함수가 실행된다.
- input의 value는 CommentForm의 state.value의 값을 받아온다.
- changeHandler() 함수에서의 e.target은 input으로 input의 value 값을 받아오고, 해당 값으로 CommentForm 컴포넌트의 state.value의 값으로 상태 값을 수정한다.
- submitHandler() 함수에서 e.preventDefault();로 새로고침 이벤트를 막고 changeHandler로 input으로 입력된 값을 state.value에 적용시켰기 때문에 state.value의 값을 Comment 컴포넌트의 함수를 실행하여 적용시킨다.
- create 함수가 실행된 후, 다시 input으로 입력받았던 state.value 값을 초기화한다.
- CommentList 컴포넌트
- Comment의 state.comment의 값을 items로 받아와 map함수로 반복시켜 render한다.
- map함수의 매개변수인 loop함수는 매개변수로 받은 value, index 값을 CommentItem 컴포넌트에 key, userid, content, date로 보내준다.
- CommentItem 컴포넌트
- CommentList 컴포넌트에서 props로 전달받은 userid, content, date 값을 render 한다.
  <body>
    <div id="root"></div>
  </body>
  <script type="text/babel">
    // 댓글이 될 컴포넌트를 생성
    // props 값을 받아서 댓글을 만들어 줄 컴포넌트
    class CommentItem extends React.Component {
      constructor(props) {
        super(props);
        // props = {userid : "작성자", content : "내용", date : "날짜"}
      }

      render() {
        return (
          // reactDOM에서는 우리가 HTML에서 사용하던 속성 이름이 아니고 class -> className으로 작성한다.
          <ul className="">
            <li>{this.props.userid}</li>
            <li>{this.props.content}</li>
            <li>{this.props.date}</li>
          </ul>
        );
      }
    }

    // 댓글 작성 form을 그리는 컴포넌트
    class CommentForm extends React.Component {
      constructor(props) {
        super(props);
        this.state = {
          // form에서 보낼 값
          // input에 입력값을 상태값으로 넣어줄 것이다.
          value: "",
        };

        this.changeHandler = this.changeHandler.bind(this);
        this.submitHandler = this.submitHandler.bind(this);
      }

      // 입력 값을 처리할 함수
      changeHandler(e) {
        // input의 value를 구조분해 할당
        const { value } = e.target;
        console.log("변경?", value);
        this.setState({
          ...this.state,
          value,
        });
      }

      // 입력을 했으면 입력을 처리할 함수
      submitHandler(e) {
        // 새로고침 이벤트 막고
        e.preventDefault();
        // 작성한 댓글을 추가해줄 곳
        this.props.create(this.state.value);
        // 다시 상태 값 초기화
        this.setState({ value: "" });
      }

      render() {
        return (
          <li>
            <form onSubmit={this.submitHandler}>
              <h4>
                댓글 작성 <span>: {this.props.length}</span>
              </h4>
              <span>
                <input
                  type="text"
                  onChange={this.changeHandler}
                  value={this.state.value}
                />
              </span>
              <input type="submit" value="등록" />
            </form>
          </li>
        );
      }
    }

    // 댓글 리스트를 그려줄 컴포넌트
    class CommentList extends React.Component {
      constructor(props) {
        super(props);
      }

      loop(value, index) {
        return (
          <CommentItem
            // key는 리엑트가 요소를 식별할 때 사용한다. 성능이 좋아진다.
            key={index}
            userid={value.userid}
            content={value.content}
            date={value.date}
          />
        );
      }

      render() {
        return <li>{this.props.items.map(this.loop)}</li>;
      }
    }

    // 댓글 기능을 담당할 컴포넌트
    class Comment extends React.Component {
      constructor(props) {
        super(props);
        this.state = {
          comment: [
            {
              userid: "weeji",
              content: "안녕",
              date: "2023/06/29",
            },
            {
              userid: "weeji2",
              content: "안녕2",
              date: "2023/06/29",
            },
          ],
        };
        this.create = this.create.bind(this);
      }

      // 새로운 댓글 작성 함수
      create(content) {
        // 컨텍스트가 유지될 수 있게 바인드 사용
        this.setState({
          comment: [
            { userid: "weeji", content, date: "2023/06/29" },
            ...this.state.comment,
          ],
        });
      }

      render() {
        return (
          <ul>
            {/* 댓글 작성 폼 */}
            <CommentForm
              create={this.create}
              length={this.state.comment.length}
            />

            {/* 댓글 리스트를 보여줄 곳 */}
            <CommentList items={this.state.comment} />
          </ul>
        );
      }
    }

    // 페이지 컴포넌트
    class App extends React.Component {
      render() {
        return (
          <div>
            {/* 댓글 레이아웃 컴포넌트를 가져옴 */}
            <Comment />
          </div>
        );
      }
    }

    // 루트설정
    const root = ReactDOM.createRoot(document.querySelector("#root"));
    root.render(<App />);
  </script>
더보기
- import / export
728x90
'블록체인_9기 > 🩵 React' 카테고리의 다른 글
| 48강_230706_React(Hook 함수(useNavigate, useLocation, useParams, useSearchParams), 상점 사이트 제작 ) (0) | 2023.07.06 |
|---|---|
| 47강_230705_React(Router, 가위바위보 제작) (0) | 2023.07.05 |
| 46강_230704_React(vscode_snippet, React 라이브러리, Hooks) (0) | 2023.07.04 |
| 45강_230703_React(babel, WebPack) (0) | 2023.07.03 |
| 43강_230628_React(React?, Component, Babel, JSX문법, react 생명주기) (0) | 2023.06.28 |


